Office 365 Integration
Unlike many third party SaaS applications, Microsoft Office 365 requires some additional set up for integration.
Each Office 365 account is provisioned their own tenant within the Microsoft Office 365 servers, so each Office 365 account essentially has it's own unique status page that can only be access from directly within your Office 365 Administrative account.
What to do in Microsoft Office 365
First, you need to grant StatusCast access to it using the following initial steps:
Office 365 Access
To successfully integrate Office 365 you will need to obtain and set up three pieces of information from your Office 365 Azure Active Directory:
A Client ID (sometimes referred to as Application ID)
A Key (sometimes referred to as Secret ID)
Your Directory ID (sometimes referred to as Tenant ID)
**Step 1: Log in to your Office 365 Administrative Portal
Step 2: Select Azure Active Directory**
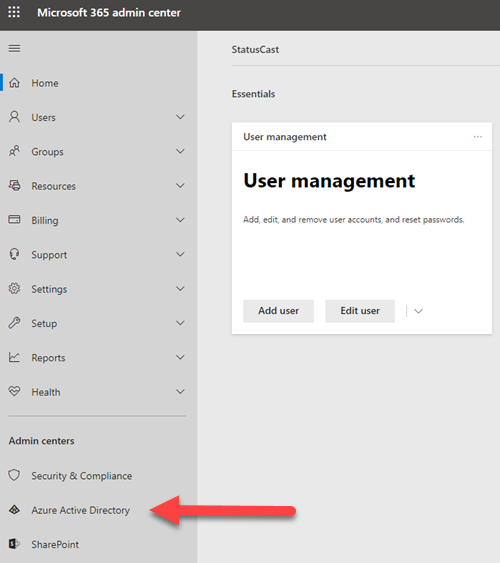
Step 3: Retrieve your Tenant ID
This is referred to as Directory ID within the Azure Portal
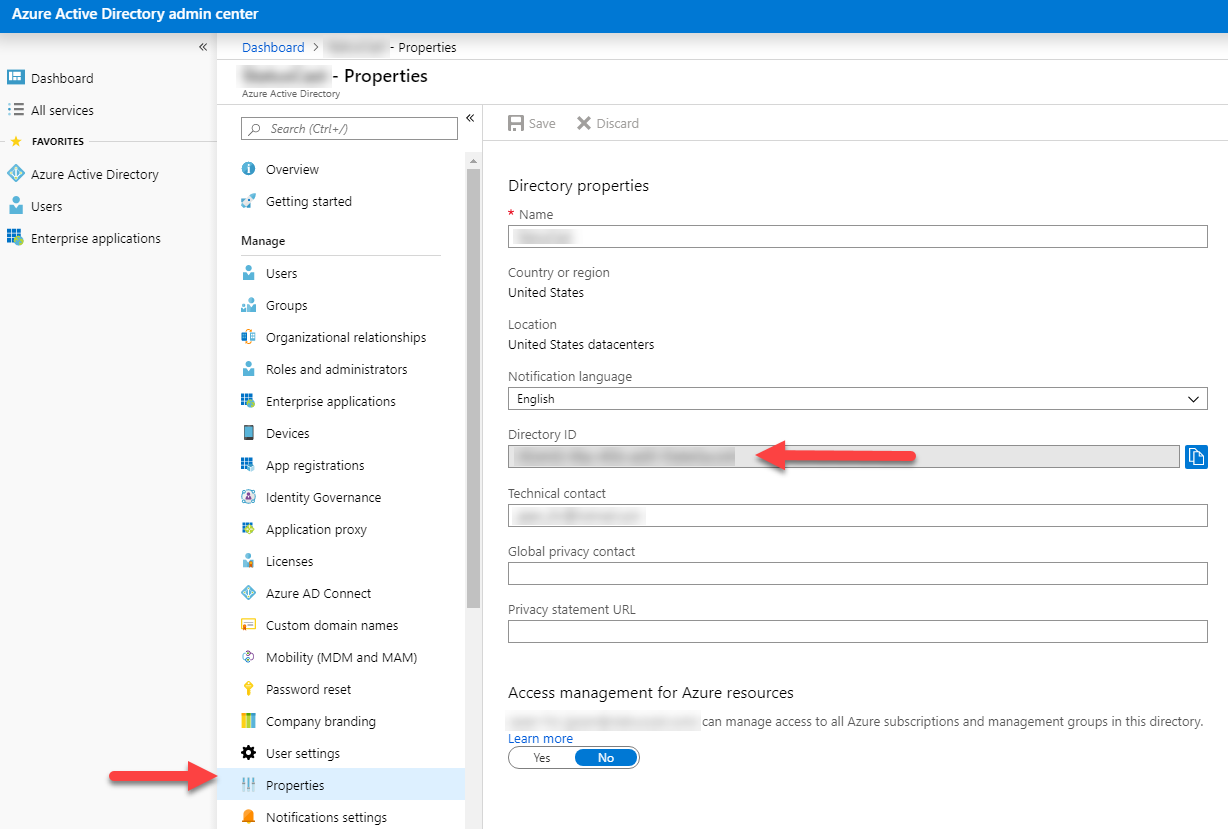
Copy and paste this value somewhere. You will need it again in a few steps.
Step 4: Register an App in Azure Active Directory
Obtaining the ClientID and SecretID require the creation of an Application. To create the app, follow these steps:
Click App Registrations
Click the +New Registration button
Name for your App "StatusCast Service Health"
Select "Accounts in this organizational directory only"
Click Register button at the bottom of the panel
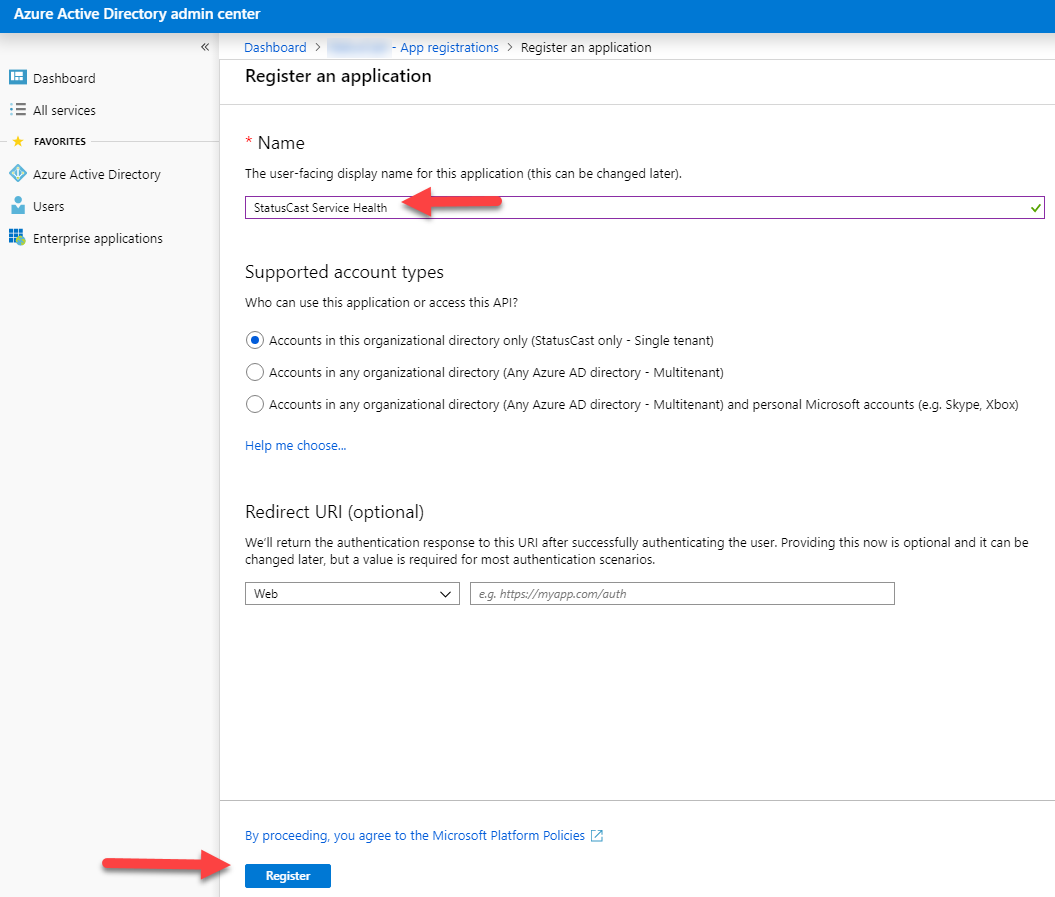
Step 5: Retrieve your Client ID
This is also called the ApplicationID from within the Azure Portal
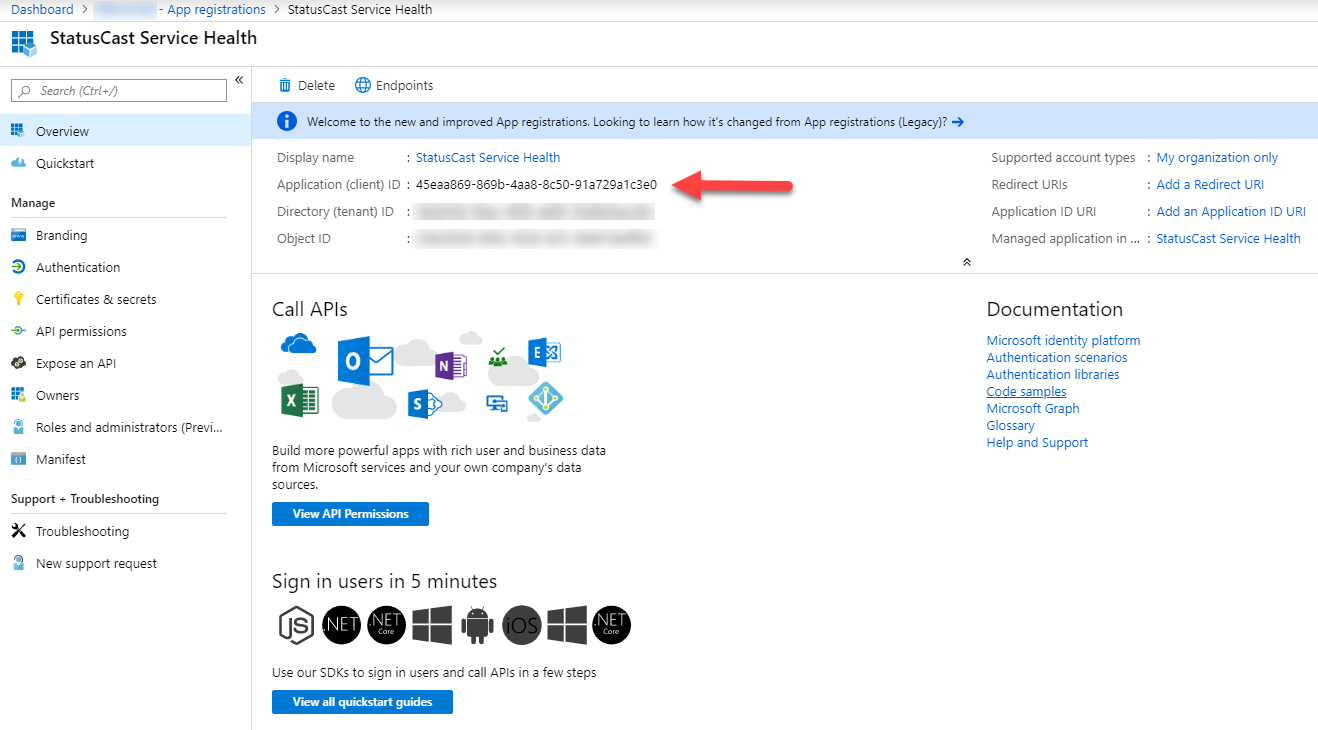
Copy and paste this value somewhere. You will need it again in a few steps.
Step 6: Create a Secret Key
Click "Certificates and Secrets"
Click New Client Secret
Create a new key, name it something familiar such as "StatusCast Secret Key"
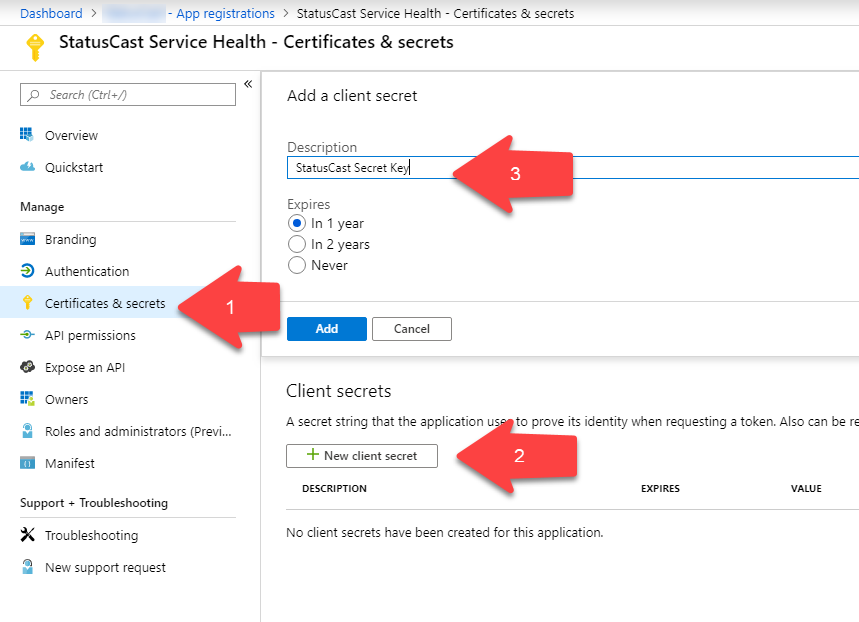
If you set the Key Expiration to anything other than "Never" you will have to re-create a new key at some point in the future.
Once you click Add, a new key is created. Copy and paste this value somewhere. You will need it again in a few steps.
Step 7: Set Permissions for the Application
Now that you have the three pieces of information needed by StatusCast to integrate with Office 365, we need to ensure that the proper permissions are set. To do so:
Click API Permissions
Click Add Permission
Select Office 365 Management APIs
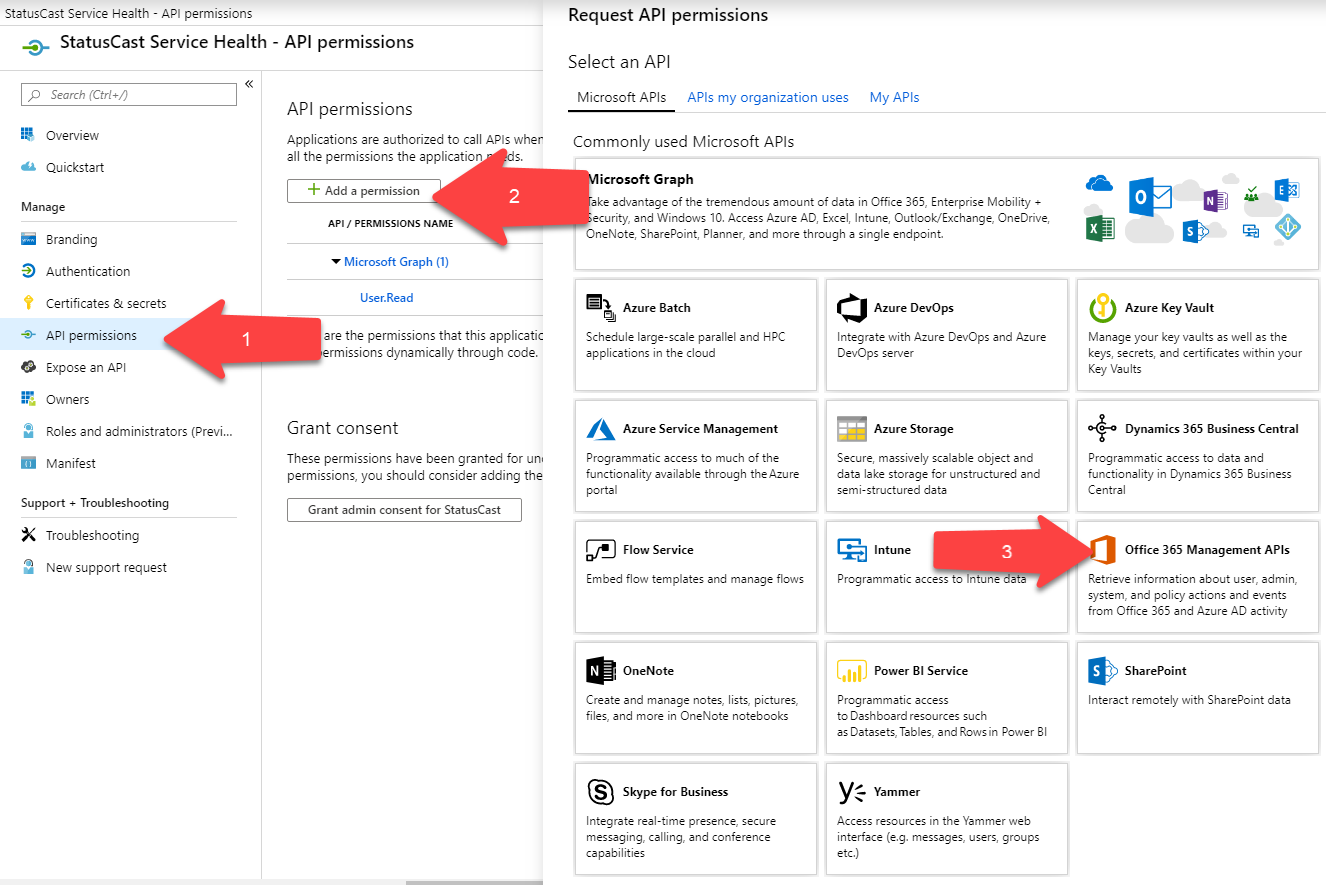
Select "Application permissions"
Select ServiceHealth > ServiceHealth.Read
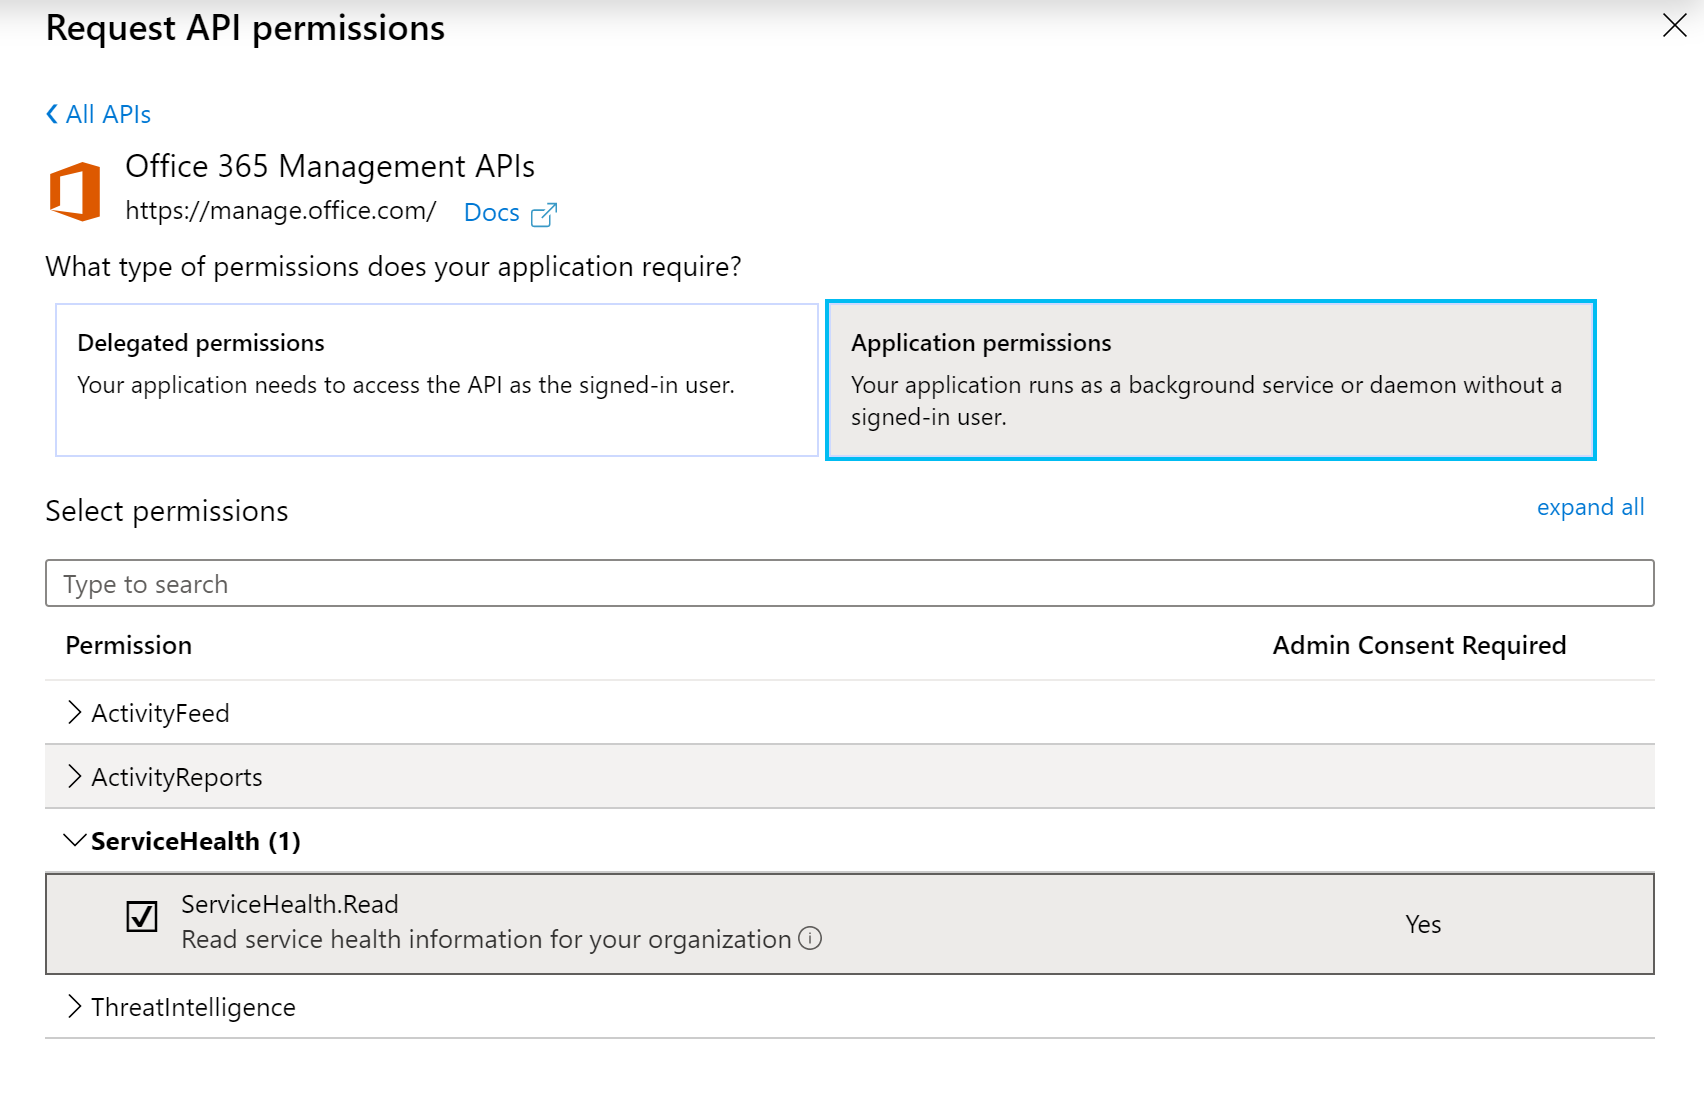
Click Add Permission
After about 30 seconds, click Grant admin consent StatusCast
Pre-Testing
To ensure you have all your Active Directory settings correct we recommend testing with the following Powershell script. If everything is working correctly it will create a local .csv file with your Office 365 most recent incidents. Errors can be found in the error.log:
For specific instructions on setting up and creating your ClientId, ClientSecret, and TenantDomain, refer to these articles:
Put your values here
$ClientID = ""
$ClientSecret = ""
$tenantdomain = ""
$script_root = Split-Path -Parent -Path $MyInvocation.MyCommand.Definition
Start-Transcript -Path "$($script_root)\log.txt" -Append
$WarningPreference = "SilentlyContinue"
$newCSV = "$($script_root)\new.csv"
try {
$body = @{granttype = "client_credentials"; resource = "https://manage.office.com"; client_id = $ClientID; client_secret = $ClientSecret }
$oauth = Invoke-RestMethod -Method Post -Uri "https://login.microsoftonline.com/$($tenantdomain)/oauth2/token?api-version=1.0" -Body $body
$headerParams = @{'Authorization' = "$($oauth.token_type) $($oauth.access_token)" }
$messages = (Invoke-RestMethod -Uri "https://manage.office.com/api/v1.0/$($tenantdomain)/ServiceComms/Messages" -Headers $headerParams -Method Get)
$incidents = $messages.Value | Where-Object { $.MessageType -eq 'Incident' }
}
catch {
$_.Exception | Format-List
EXIT
}
$newResult = @()
foreach ($message in $incidents) {
[int]$msgCount = ($message.Messages.Count) - 1
$temp = "" | Select-Object ID, Classification, Title, Workload, Status, StartTime, LastUpdatedTime, EndTime, ActionType, AffectedTenantCount, Message, MessageType, WorkloadDisplayName, Feature, FeatureDisplayName, PostIncidentDocumentUrl, Severity, ImpactDescription
$temp.ID = $message.ID
$temp.Title = $message.Title
$temp.Classification = $message.Classification
$temp.Workload = $message.Workload
$temp.WorkloadDisplayName = $message.WorkloadDisplayName
$temp.Status = $message.Status
$temp.Feature = $message.Feature
$temp.FeatureDisplayName = $message.FeatureDisplayName
$temp.MessageType = $message.MessageType
if ($message.StartTime) { $temp.StartTime = [datetime]$message.StartTime }
if ($message.LastUpdatedTime) { $temp.LastUpdatedTime = [datetime]$message.LastUpdatedTime }
if ($message.EndTime) { $temp.EndTime = [datetime]$message.EndTime }
$temp.Message = $message.Messages[$msgCount].MessageText
$temp.ActionType = $message.ActionType
$temp.AffectedTenantCount = $message.AffectedTenantCount
$temp.PostIncidentDocumentUrl = $message.PostIncidentDocumentUrl
$temp.Severity = $message.Severity
$temp.ImpactDescription = $message.ImpactDescription
$newResult += $temp
}
$newResult | Sort-Object LastUpdatedTime -Descending | export-Csv -notypeInformation $newCSV
$newResult = Import-Csv $newCSV
Stop-Transcript
StatusCast Integration
Now that Azure and Office 365 are set up correctly, log in to your StatusCast administrative portal.
- Navigate to your portal.
- Click on Settings, then Integrations.
- Click Install under the Office 365 integration card.
- Enter the Office 365 Tenant Id, Client Id, and finally your Secret Key from the Office 365 setup.
- Click on Install and complete integration.
After your integration is set up, it may take up to 30 minutes for the first round of data to be created. After StatusCast completes its first pass, your account will have new Office 365 components created. You can access them by going to the Service components management section of the administrative application.
Warning: Do not re-arrange the Office 365 components from outside the root "Office 365" component. Doing so will cause your integration to break.
Hiding Office 365 Components
By default, the integration adds all Office 365 components to your account. If you only want specific applications to be displayed, you may hide individual components. Remember, do NOT change the root Office 365 component or attempt to re-arrange the order and hierarchy of the components.
Choose your Office 365 Components to display on your page
- In the portal click on Settings, then Settings again.
- Select Beacons from the left menu.
- Create a new Beacon.
- Give the beacon a Name and select Third Party Status Page from the beacon type dropdown.
- Select Office 365 from the providers.
- Choose the components you want to display on your status page.
- Click Submit and your Office 365 components should appear on your components tab and on your status page.
Updated 11 months ago
