OKTA OpenID Integration
StatusCast allows you to utilize the OpenID feature built into Okta so that your administrators and users don’t need to manage multiple passwords.
OKTA App Setup
To start, login to OKTA with an administrative user and navigate to the Applications section.
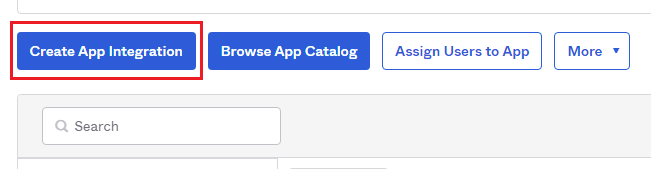
- Click the Create App Integration button.
- Select OIDC - OpenID Connect.
- Select Web Application. Click Next.

- Edit the Following fields:
App integration name - Choose a name for your OpenID connection
Sign-in redirect URIs USE - https://status.statuscast.com/authentication/openid

- Choose who you would like to provide access via OpenID in your organization.

- Click Save.
- Return to the top of the page and Copy the Client ID and Client Secret to a secure location.
Identity Provider Setup
- Navigate to the Security > Identity Provider section.
- Click Add Identity Provider
- Select OpenID

- Fill out the following fields:
- Name
- Scopes -*The minimum scope needed to be added is openid

- Client ID -Paste the client ID that you obtained from the OKTA App
- Client Secret -Paste the secret that you obtained from the OKTA App

- Issuer -The identifier of the OpenID Connect provider. For example: https://${theIdPdomain}/
- Authorization endpoint -The URL of the Identity Provider's OAuth 2.0 authorization endpoint. For example: https://${theIdPdomain}/oauth2/v1/authorize
- Token endpoint -The URL of the Identity Provider's token endpoint for obtaining access and ID tokens. For example: https://${theIdPdomain}/oauth2/v1/token
- JWKS endpoint -The URL of the Identity Provider's JSON Web Key Set document. This document contains signing keys that are used to validate the signatures from the provider. For example: https://${theIdPdomain}/oauth2/v1/keys

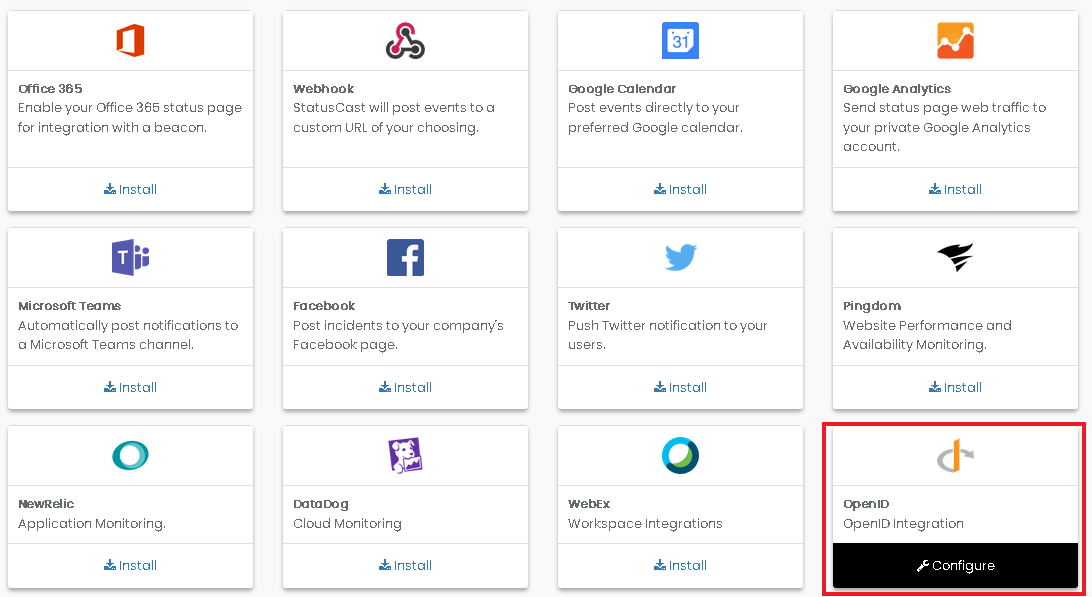
Installing the SSO Integration
On the Admin page of in StatusCast, Navigate to Settings > Integrations. Find OpenID and click Install.
Click Add SSO Config

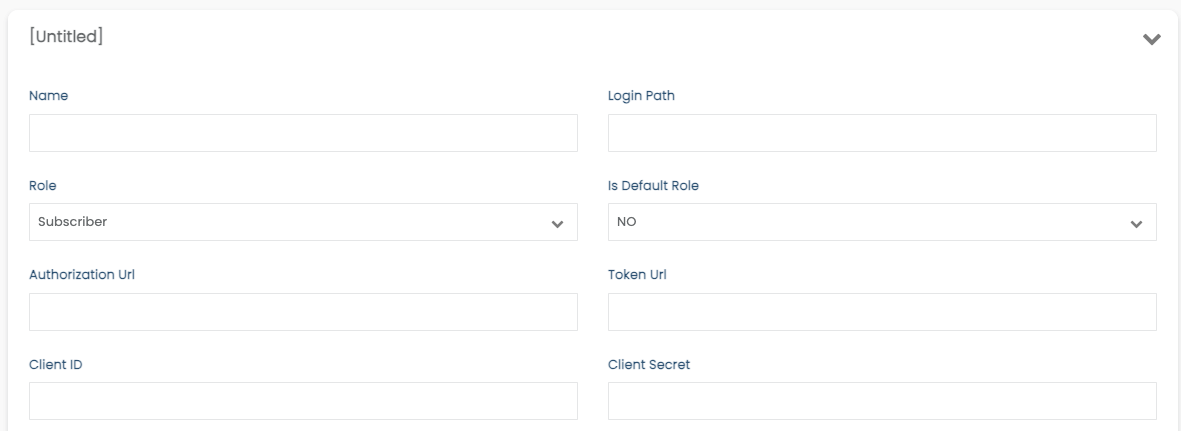
Add SSO
Choose a Role to configure.
- Fill out the following fields:
- Name- Give this set-up a name so you can distinguish it if you need to make a change
- Login Path- All SSO logins use your page url /login/[myloginpath]. This value is the part or your URL after the /login/ . This is the endpoint for the users allowing them to login using this SSO integration. You can call it anything that makes sense for you. Ex for: https://mypage.status.page/login/subscribers1 use: subscribers1
- Authorization URL - https://status.statuscast.com/authentication/openid
- Token URL - https://${theIdPdomain}/oauth2/v1/token
- Client ID -Paste the client ID that you obtained from the OKTA App
- Client Secret -Paste the secret that you obtained from the OKTA App
Be sure to Save your configuration using the orange button at the top when completed.
Signing In
Now your integration is complete and the users you granted access to can sign into StatusCast using their SSO credentials.
Commonly used URL paths for each of the roles are listed below, but you can now choose these in the integration settings. Be sure to send your users to the appropriate path.
Subscriber > https://[yourapp].status.page/login
Employee > https://[yourapp].status.page/login/employee
Manager > https://[yourapp].status.page/login/manager
Administrator > https://[yourapp].status.page/login/admin
Company Administrator > https://[yourapp].status.page/login/companyadmin
Updated about 1 year ago