Microsoft Azure Active Directory SSO Integration
StatusCast allows you to utilize Azure’s AD so that you’re administrators and users don’t need to manage multiple passwords. Please note that at this time StatusCast’s SSO integration is considered an IDP initiated SSO, so you will still have to manage access restrictions to the administrative portal through StatusCast.
Azure Settings
To setup SSO with StatusCast you will need to first add a new Enterprise Application to your Azure environment under the Azure Active Directory section. The name of the Enterprise Application is not significant to StatusCast. Under the Single sign-on section within your new application, set the SSO mode to SAML-based Sign-on and under the Identifier(Entity ID) and Reply URL fields set both to https://[YOURDOMAIN].status.page/sso/saml. Set the User Identifier to user.mail.

There should not be any further configuration required for your enterprise application, however please note that you will need to provide your users in Azure access to this integration through the Users and groups section of your application.
Statuscast Settings
In a new tab or window log into your StatusCast admin portal. Navigate to the Integrations section by clicking Settings > Integrations. Under the SSO card select the Install option. (https://[yourapp].status.page/admin/integrations/sso)

SSO Integration
Click Add SSO Configuration

Add SSO
To complete the integration select the role you want to assign users first. You can assign user roles to allow permissions to view or access specific component data. You should go through this process for each role you will be using SSO for authentication in StatusCast. You may set up more than one provider per role.
Each Integration set up must have a unique path and Certificate even if the SSO provider is the same for varying roles.
- Select the User Role
- Select Azure as your SSO Provider Type
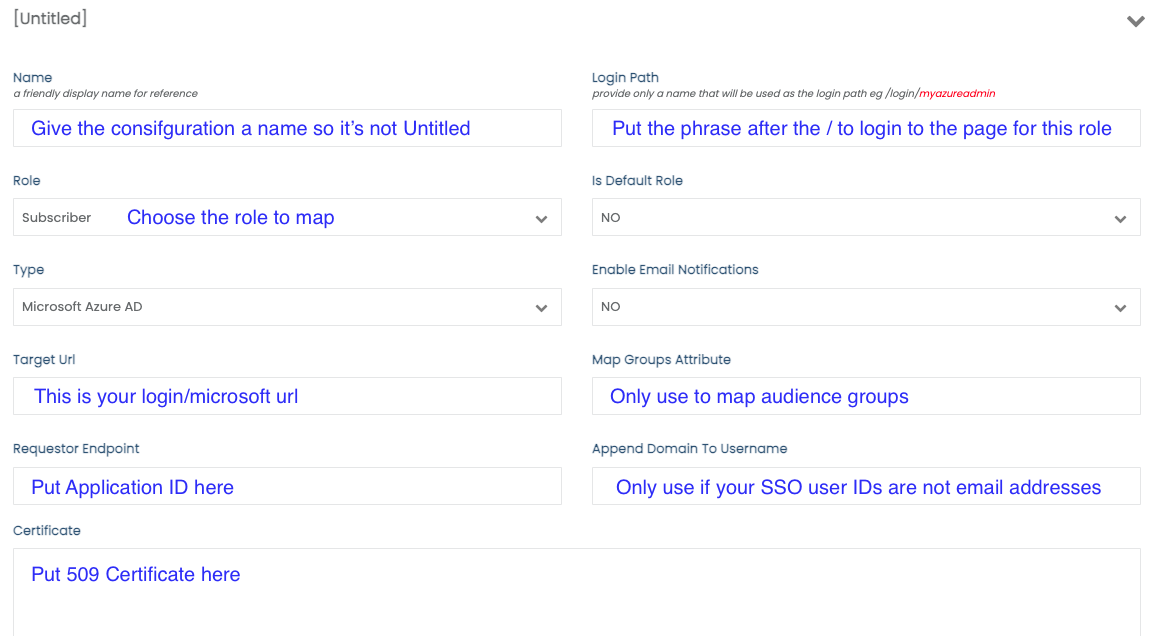
- Fill in the details for the integration. See the chart below for details
- Be sure to Save your configuration using the orange button at the top when completed.
- Continue adding additional Configurations as needed
| Label | Description |
|---|---|
| Name | Give this set-up a name so you can distinguish it if you need to make a change |
| Login Path | All SSO logins use your page url /login/[myloginpath]. This value is the part or your URL after the /login/ . This is the endpoint for the users allowing them to login using this SSO integration. You can call it anything that makes sense for you. Ex: For https://mypage.status.page/login/subscribers1 use: subscribers1 |
| Role | Select the Role of the users for this integration. See Roles for more information. |
| Is Default Role | If the default is not set, the first integration for the role will be chosen if the user is using our former standard role-based SSO paths like: /login/employee... |
| Type | Select the SSO type from the dropdown. Use SAML 2.0 if the type is not defined in the dropdown |
| Enable Email Notifications | Automatically sign up a Subscriber or Employee for Email notifications |
| Target URL | Enter the SSO Sign-in URL, in the setup instructions this is labeled as your Identity Provider Single Sign-On URL. |
| Requestor Endpoint | Put the App ID in this field |
| Map Groups Attribute | Optionally, you can add a Group Attribute. See Groups Attribute |
| Append Domain Name to User Name | If your SSO doesn't send the username over as an email address @somewhere.com will need to be appended to the username to work with our system. Add the domain here. |
| Certificate | Paste a copy of your X.509 Certificate |
Signing In
Now your integration is complete and the users you granted access to can sign into StatusCast using their SSO credentials.
Commonly used URL paths for each of the roles are listed below, but you can now choose these in the integration settings. Be sure to send your users to the appropriate path.
Subscriber > https://[yourapp].status.page/login
Employee > https://[yourapp].status.page/login/employee
Manager > https://[yourapp].status.page/login/manager
Administrator > https://[yourapp].status.page/login/admin
Company Administrator > https://[yourapp].status.page/login/companyadmin
Updated 5 months ago